How to integrate Sign In with Apple in your iOS app
With iOS13, Apple is introducing “Sign In with Apple”, an authentication system that allows user create an account for your app based on their Apple ID. Let’s see how to integrate it in your app and be ready for iOS13 launch.
Before starting anything, you might ask yourself: “do I really need another sign-in system?”. Well, the answer depends if you already used third party.
From Apple Guidelines:
Sign In with Apple will be available for beta testing this summer. It will be required as an option for users in apps that support third-party sign-in when it is commercially available later this year.
In short, if you use Facebook, Twitter, Google or any other third-party system, Apple will require your to have theirs as well. Your app might be rejected otherwise.
If you don’t use any of those, then Sign in with Apple becomes a nice to have.
Concept
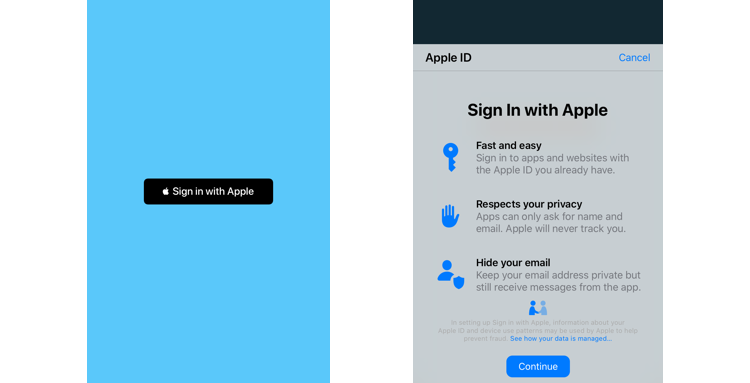
With Sign in with Apple, Apple wants to tackle a pain point for many mobile users: create a specific account foreach app they used. By using their signing system, Apple enforces more privacy and security to their users.
It’s also more transparent to the user what is shared with the application used: first name, last name, email, etc.
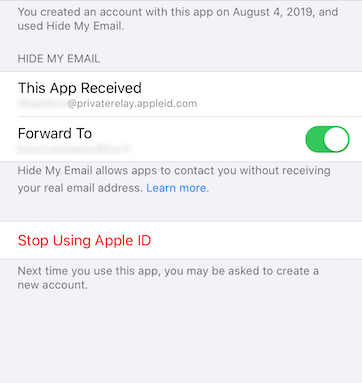
On top of this, it allows Apple users to create a relay address to limit / avoid email campaign usage.
From Apple documentation, Sign in with Apple is available for any apps (iOS, MacOS, tvOS and WatchOS) as well as website through a javascript code to integrate. Let’s start small with iOS first.
This post is based on Xcode 11 Beta 5 and current available documentation.
Prepare your app
First thing first, we need to add the capability to our app. One way can either go edit it on Apple developer portal.

The other way is to do it through Xcode directly. Either way, editing App capabilities also invalidate your provisioning profiles and might require to regenerate new one.
Once ready, we can move on to the code side.
Code
To be able to add Sign in with Apple button in our code, we need to import AuthenticationServices framework to be able to use ASAuthorizationAppleIDButton class.
At the moment (Xcode11 Beta 5) this button isn’t available through Interface Builder which I believe is by design: to keep consistent look and feel across devices, Apple doesn’t allow any design modification (text, color, background), therefore we’ll have to add it programmatically.
import AuthenticationServices

// …
let signInButton = ASAuthorizationAppleIDButton()
self.view.addSubview(signInButton)
The button is available in two format: “Sign in with Apple” or “Continue with Apple”. You can also adjust corner radius to match your design but that’s pretty much it.
Once the button ready to your taste, we’ll need to bind some logic behind. First we need get a authorization provider to build create a sign in request. Then we can define our scope of action. Here I’ll capture the email only.
let authorizationProvider = ASAuthorizationAppleIDProvider()
let request = authorizationProvider.createRequest()
request.requestedScopes = [.email]
For the requested scope, only two options are available at the moment: email and full name. We can imagine Apple extending it in the future to other information, for instance birthday or phone number maybe?
Our request is ready, we’ll need to present in to our user. To do so, we’ll need an authorization controller for that. We’ll get the callback following the associated delegate but also provide the presentation context (as in which window to display the controller).
let authorizationController = ASAuthorizationController(authorizationRequests: [request])
authorizationController.delegate = self // ASAuthorizationControllerDelegate
authorizationController.presentationContextProvider = self // ASAuthorizationControllerPresentationContextProviding
authorizationController.performRequests()
Now, we only need to capture if the user successfully authorized the app to sign in with Apple using the delegation methods
extension ViewController: ASAuthorizationControllerDelegate {

    func authorizationController(controller: ASAuthorizationController, didCompleteWithAuthorization authorization: ASAuthorization) {
        guard let appleIDCredential = authorization.credential as? ASAuthorizationAppleIDCredential else {
            return
        }

        print(“AppleID Credential Authorization: userId: \(appleIDCredential.user), email: \(String(describing: appleIDCredential.email))”)

    }
    func authorizationController(controller: ASAuthorizationController, didCompleteWithError error: Error) {
        print(“AppleID Credential failed with error: \(error.localizedDescription)”)
    }
}
Let’s not forget to give the presentation context
extension ViewController: ASAuthorizationControllerPresentationContextProviding {
    func presentationAnchor(for controller: ASAuthorizationController) -> ASPresentationAnchor {
        return self.view.window!
    }
}
When successfully authorized, Apple create a unique identifier which is linked to your application as well as the Apple ID used. If a mobile user chose to hide his email address and use a relay email address, this will also be unique for your application.
Here is the final version of my very naive MVC with Sign In with Apple.
import UIKit
import AuthenticationServices

class ViewController: UIViewController {

    override func viewDidLoad() {
        super.viewDidLoad()
        self.view.backgroundColor = .systemTeal
        self.setupSignInButton()
    }

    private func setupSignInButton() {
        let signInButton = ASAuthorizationAppleIDButton()
        signInButton.addTarget(self, action: #selector(ViewController.signInButtonTapped), for: .touchDown)

        signInButton.translatesAutoresizingMaskIntoConstraints = false
        self.view.addSubview(signInButton)

        NSLayoutConstraint.activate([
            signInButton.centerXAnchor.constraint(equalToSystemSpacingAfter: view.centerXAnchor, multiplier: 1),
            signInButton.centerYAnchor.constraint(equalToSystemSpacingBelow: view.centerYAnchor, multiplier: 1),
            signInButton.heightAnchor.constraint(equalToConstant: 40),
            signInButton.widthAnchor.constraint(equalToConstant: 200)
        ])
    }

    @objc private func signInButtonTapped() {
        let authorizationProvider = ASAuthorizationAppleIDProvider()
        let request = authorizationProvider.createRequest()
        request.requestedScopes = [.email]

        let authorizationController = ASAuthorizationController(authorizationRequests: [request])
        authorizationController.delegate = self
        authorizationController.presentationContextProvider = self
        authorizationController.performRequests()
    }
}

extension ViewController: ASAuthorizationControllerDelegate {

    func authorizationController(controller: ASAuthorizationController, didCompleteWithAuthorization authorization: ASAuthorization) {
        guard let appleIDCredential = authorization.credential as? ASAuthorizationAppleIDCredential else {
            return
        }

        print(“AppleID Credential Authorization: userId: \(appleIDCredential.user), email: \(String(describing: appleIDCredential.email))”)

    }
    func authorizationController(controller: ASAuthorizationController, didCompleteWithError error: Error) {
        print(“AppleID Credential failed with error: \(error.localizedDescription)”)
    }
}

extension ViewController: ASAuthorizationControllerPresentationContextProviding {
    func presentationAnchor(for controller: ASAuthorizationController) -> ASPresentationAnchor {
        return self.view.window!
    }
}
So far, we managed to get our user sign in with Apple but I also found couple things that might be useful to know.
To go further
Interestingly, I discovered that ASAuthorizationAppleIDButtonis only a UIControl with a standardized design. It’s not enforcing to use with the authorization request. However, I’m sure Apple will enforce the authorization request with the matching button at App Store review.
As mentioned earlier, the user identifier and relay email is unique for the application and the user and don’t seem to change, even after removing my Apple ID.
I tried couple time to dissociate my account from the app, and every new account with the Apple ID would regenerate the same identifier.
This can be understanding from a multi-device usage: if a user creates an account on his iPhone, when using his iPad, it would get the same user identifier, therefore recognized as same user.
I also got chance to go further during an Apple workshop. From my understanding, a user identifier never expire, opposite to cookies or access token from third party platform which are valid to a specific point. Depending of app usage, it might not be a problem, but I would still advise for you to re-enforce the user signing in / logging in if it touch to e-commerce / finance app.
Since the authentication is now done in the client app, it means you need to update your backend services as well to conform to this new system, stocking the user identifier for instance, over the usual password hash.
Finally, from a marketing point of view: a relay address never expire neither. So if a user stop using Apple ID with your app, Apple also stop forwarding email to him. I’m not sure how it would be handle, but your marketing team might never know if the email has been actually delivered or not.
In conclusion, Sign in with Apple might help quite a lot mobile users to create account in couple seconds with thinking of password and usage between multiple devices. On the other, it can raise quite a lot of questions for the rest of your organization.
To know a bit more about it, I would advise to watch WWDC 2019 video on that subject: Introducing Sign In with Apple - WWDC 2019
I created a sample app here but there is also an official one there.