Create a machine learning model to classify Fashion images in Swift
Since WWDC18, Apple made it way easier to developers to create model for machine learning to integrate iOS apps. I have tried myself in the past different models, one for face detection and create another with Tensorflow to fashion classification during a hackathon. Today I’ll share with you how I create a model dedicated to fashion brands.
Machine learning applied to fashion isn’t something new. Different companies work on that subject, included Zalando, but often the subject is to classify product category (shoes vs t-shirt vs trousers). I wanted to take a different angle and train model to recognise brand for a given category. So I started with shoes.
Development Environment
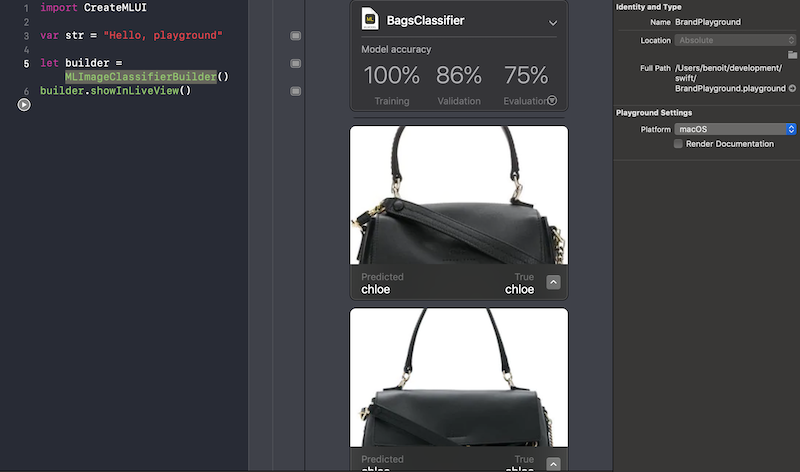
Introduced in Xcode10, Apple let developers to build and train their own model with MLImageClassifierBuilder from CreatML framework, available straight from Xcode Playground. You need to make sure your playground settings platform is set to OSX.
import CreateMLUI

let builder = MLImageClassifierBuilder()
builder.showInLiveView()
From that code, you’ll be able to start training your image classifier.
Dataset
I haven’t find any data set dedicated to fashion brands. So I built my own. I’ll get two folders, one Training Data, one Test Data, each containing a list of subfolders for each label. A label represents here a brand, it would be Nike, Adidas, etc.
From Apple documentation:
Use at least 10 images per label for the training set, but more is always better. Also, balance the number of images for each label.
So I browse Google Image and saved 15 images foreach label. I quickly faced a problem, Xcode quickly stopped and the training / validation wasn’t fully complete. I needed more data, so I scripted my way out.
I used a browser automation tool to help me extract images faster. I quickly got 300 images of fashion sneakers ready to use and extra 40 more to test.
Note: make sure those images aren’t duplicated from the training one.
Training your model
ImageClassifierBuilder is as easy as a drag and drop. With default options, you’ll get 10 iterations for each of your images to train your model. After dropping your training data, you can see Xcode iterating to build and learn from it, extracting features foreach one of those.
Finally, you can check how accurate is your model against your test data.
If your training accuracy is too low, you can play with the option builder and add more iterations (put it to 20 or 30) to make sure you hit the target.
On the other side, if your validation accuracy is too low as well, you might try some augmentation to create more images to train against. You can read more about it in Apple documentation.
Test your model
Once your model ready and you are happy with its accuracy, you can save it on your laptop and integrate to an iOS project to test it within your app.
I wanted to stay focus on the machine learning model and less about the iOS app for once, so I reused the sample app classifying image with Vision and CoreML made my Apple. After importing my new model, it was ready to test in real life.
So I started small with easy shoes to recognise in same type of images from the training : shoe picture from the side. The result was pretty accurate, both above 80%.
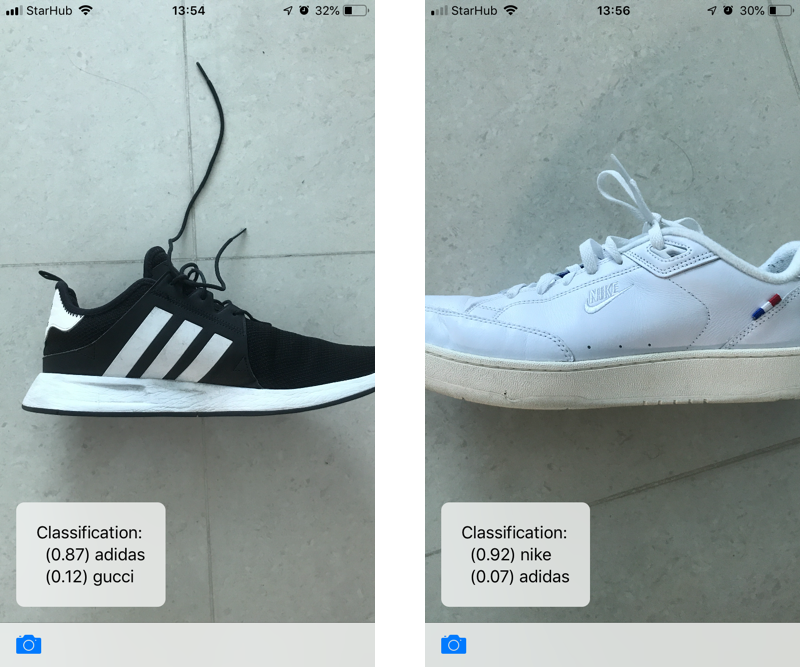
Then I tried same shoes with a different angle, and the result already start to get confused, feeling my Nike are 100% Vans.

Improve your model
I wanted to find out where I’m loosing accuracy with same products.
The first reason is based on the training data. I had 300 images but all having same angle. My model can be good enough with same kind of angle but we can’t except to get accuracy against something it didn’t have training. I would need more images with different angle to improve accuracy.
At the same time, 300 images might not be enough, the famous MNIST dataset includes 60 000 for training, 10 000 for testing.
Another reason is that the model computes the whole image to get a result, it doesn’t stop to the shoe itself. Other elements in the picture are equivalent to noise and can decrease the accuracy. A good way to improve it would be to apply a different model before to detect the shoe in the image first, and apply the brand classifier image on it only.
Finally, the whole approach is based on classifying images to the right fashion brand. However, the training data is limited to fashion products, sneakers always include same kind of feature. At the same time, fashion brand can have similar feature as well (shape, color, etc). Therefore our model can find common features regardless of the brand.
So I came back with a different angle but same idea. Instead of training with shoes, I could train with a bigger fashion product where shape and angles are less common but where brand keep consistency in their product: hand bags.
Retrain your model
Using hand bags instead of shoes, I updated my script to capture about 400 images of bags: 100 images per brand to train, 10 more to test.
Only from a training perspective I got better results compared to the shoes
- Shoes
- 30 iterations with 300 images, 50 per brand : 100% training, 71% validation 70% evaluation
- 50 iterations with 300 images, 50 per brand : 100% training, 71% validation 73% evaluation
- Hand bags
- 30 iterations with 400 images, 100 per brand: 100% training, 86% validation 73% evaluation
- 50 iterations with 400 images, 100 per brand: 100% training, 86% validation 75% evaluation
In conclusion, with CoreML and CreateML frameworks, Apple makes its very easy for Swift developers to build and train their own machine learning model to make great apps.
However, as you might have noticed, here the challenge is less about the Swift code itself but the approach of what you want to identify. For instance, I could have take another angle and use logo foreach brand instead of training from their own fashion products.
Regardless, machine learning in Swift is still something emerging, I can’t wait to dig more in the subject and find different kind of applications.
Thanks for reading!