Data Structure - Implementing a Tree in Swift
Following up previous articles about common data structure in Swift, this week it’s time to cover the Tree, a very important concept that we use everyday in iOS development. Let’s dive in.
Concept
Opposite to linear structure that we’ve covered like Queue or Stack, a Tree is hierarchical structure represented by a set of linked node. It start with a root node and can have multiple subtrees from there.

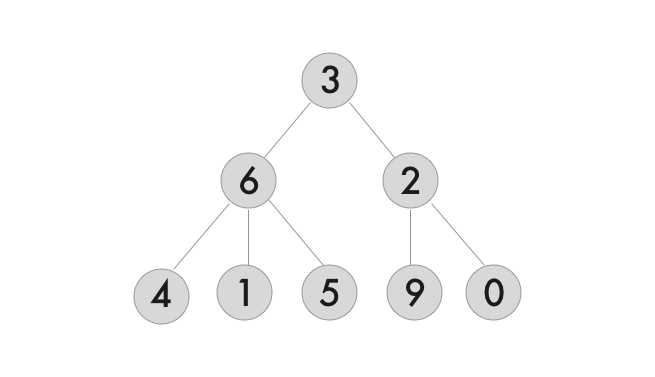
This example represent a generic tree, each node is labeled with an integer but it’s not sorted, or unique, some has more children nodes than others. Nothing much specific there. It’s important to highlight because we will cover specific type of tree later on, like Binary Tree or Binary Search Tree.
Implementation
Since we represent a Tree by its root node, we’ll need to define a node and the ability to link children to it. We can also represent its parent relationship.
class Node<T> {
    private let value: T
    var children: [Node<T>]
    weak var parent: Node<T>?

    init(_ value: T) {
        self.value = value
        self.children = []
    }

    func addChild(_ node: Node<T>) {
        self.children.append(node)
        node.parent = self
    }
}
From there, we can use it to represent a company’s hierarchy for instance.
let company = Node<String>("myCompany")

// we create a structure to represent Engineering team
let engineering = Node<String>("Engineering")
engineering.addChild(Node<String>("Mobile"))
engineering.addChild(Node<String>("Backend"))
engineering.addChild(Node<String>("Security"))

// we create other structure for other teams
company.addChild(Node<String>("Marketing"))
company.addChild(Node<String>("Operation"))
company.addChild(engineering)
How to go through a Tree?
The first intuition is to visit each node and its children. However, the order to visit them might differ.
There are three common way to go through a generic tree like above:
-
level-order traversal: we traverse the tree in a breath-first approach, per level: 3, 6, 2, 4, 1, 5, 9, 0.
-
pre-order traversal: we visit first the root, then traverse the subtree foreach children, one by one. It would give us from the example: 3, 6, 4, 1, 5, 2, 9, 0.
-
post-order traversal: we traverse the subtree foreach children first, then we visit the root node. It would give us that order: 4, 1, 5, 6, 9, 0, 2, 3.
Now we know understand the basic concept of a Tree and how to implement one, let’s where we use it in iOS development.
Usage
If we think about Tree applied to iOS, we need to think about when we use hierarchy structure in our code. The first example that comes to mind is UI layer.
If I create a UIView, I can add subviews to it, and each subview can have its own subviews as well. That’s a Tree here. It also works for CALayer and it’s sublayers.
let mainView = UIView() // creating root

let firstView = UIView()
let secondView = UIView()
mainView.addSubview(firstView)
mainView.addSubview(secondView) // adding relationship between parent <-> child

mainView.subviews // represent children views
secondView.superview // represent parent view
If you open the iOS view hierarchy inspector when you app run, it’s actually a representation of that complex tree from it’s root, the UIWindow.
Great, but what do I with this?
Well, that’s where it got really interesting. We can leverage our knowledge about tree to resolve daily problem.
If I ask you the closest common superview between two views, you might think a bit about how to tackle that problem. However, it’s a common question when using Tree data structure. The solution becomes trivial as well.
In conclusion, we introduced some basic concept of tree and its implementation in Swift. Most important, we saw how it applies to our daily job. I believe more and more it’s important to master those type of data structure to be able to recognize what kind of problem we’re dealing with, so that we can solve it the best way. Adding Tree data structure to your tool belt will definitely help.
To go further: