Automating App Store localized screenshots with XCTest and Xcode Test Plan
One reason I like so much working on native mobile apps is to deliver the user experience based on their region and location. Although, for every update, it can be painful for developers to recapture screenshots foreach available language. Today, I’ll share how to automate this with UI tests and Xcode tools.
Prerequisites
For UI tests, it’s best practice to attach accessibility identifiers to make it easier to detect the required UI elements.
If you don’t have any yet, let’s create couple of them. For this example, we can create a shared structure between the app codebase and its UI tests, so we can reuse it.
enum AccessibilityIdentifiers {
    // tab bars
    case searchTab
    case accountTab

    // buttons
    case searchButton
    case loginButton
}
From there, we can set identifiers programmatically to each UI component we need.
let tabItem = UITabBarItem(title: "Search", image: image, selectedImage: nil)
tabItem.accessibilityIdentifier = AccessibilityIdentifiers.searchTab.rawValue

let loginButton = UIButton(...)
loginButton.accessibilityIdentifier = AccessibilityIdentifiers.loginButton.rawValue
We can do the same through xib and storyboard files but, over time and at scale, it’s much harder to maintain. I would recommend to always keep it within the code.
To make sure the identifiers are properly set, you can use Accessibility Inspector from Xcode > Open Developer Tools to inspect your design and their accessibility properties.
Our project is ready to test, we are ready to take some screenshots.
UITests
UI tests are designed to make sure a feature or user journey behaves as expected. Where unit test focus on the code behaviors and in-dept logic, UI Tests ensures a component is on the screen, clickable and the navigation follows the expectation.
Code wise, UI tests and unit tests are really similar: they both rely on XCTest. This is great for us, because XCTest support file attachment, so we can capture screenshot and attach ot the test report to inspect later. This is how we will capture our screenshot.
So first, we need to define a test file to test each app journey we want to capture for the App Store. It can be as simple as selecting the right tabBarItem as a start.
class AppStoreScreenshotTests: XCTestCase {

    var app : XCUIApplication!

    override func setUpWithError() throws {
        continueAfterFailure = false
        self.app = XCUIApplication()
    }

    override func tearDownWithError() throws {
        self.app = nil
    }

    func testSearchJourney() {
        self.app.launch()

        // moving to search tab
        app.buttons[AccessibilityIdentifiers.searchTab.rawValue].tap()

        // wait for screen to be fully displayed within 5sec
        XCTAssertTrue(app.buttons[AccessibilityIdentifiers.searchButton.rawValue].waitForExistence(timeout: 5))

        // screenshot search
        attachScreenshot(name: "search-form")
    }

    private func attachScreenshot(name: String) {
        let screenshot = app.windows.firstMatch.screenshot()
        let attachment = XCTAttachment(screenshot: screenshot)
        attachment.name = name
        attachment.lifetime = .keepAlways
        add(attachment)
    }
In this test, I select the tabBarItem by its identifier, then wait for the searchButton to be displayed to make sure I’m on the right screen and navigation is performed. That’s necessary if you don’t want to create sleep timer hoping for whatever push or modal transition has finished.
Finally, we take a screenshot based on the app window. To make it more explicit, I pass a name as well to organize our output. It’s important to set a lifetime .keepAlways to make sure the screenshot won’t be discarded if the test pass because we expect it to pass.
If I run this journey and check my test report, I can see files attached to it.
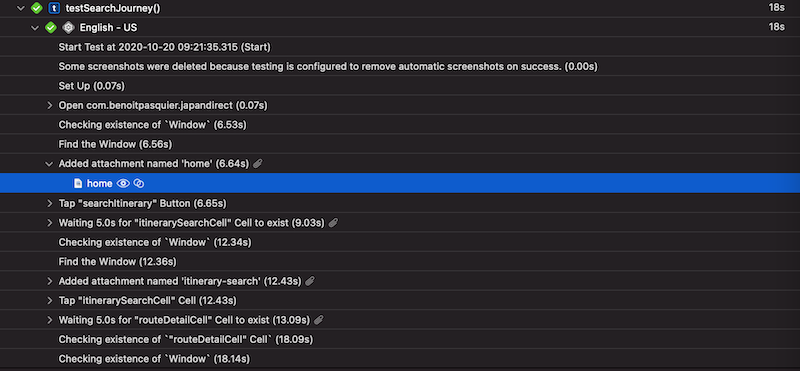
So far, it doesn’t seem much but it makes sure that any new update on that screen as small as the changes can be, we’ll have a new screenshot available for the App Store, ready to release.
Let’s see now how to localize and automate this further.
Xcode Test Plan
In this example, I’ve used Xcode Test Plan to create a specific configuration for my App Store journey, but it can be set with Xcode scheme as well, it’s a bit less straightforward in my opinion.
If you don’t have one yet, you can create a Test Plan based on your current scheme, going under Schemes > Edit Scheme > Test > Migrate to Test Plan. Once one is created, you can select what test target to use and customize the configuration.
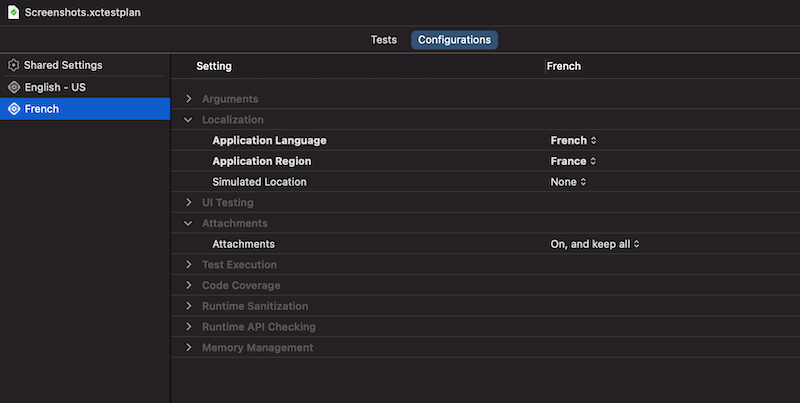
In my case, I’ve created a specific Screenshots Test Plan where I’ve selected only the journey I wanted to cover. Make sure it doesn’t automatically add new tests to it, otherwise it will get polluted with new tests in future. I’ve also setup a shared configuration where it enforce to keep all attachment and doesn’t delete it in future.
Finally, I’ve duplicated this configuration with specific application language and region. This will allow us to get localized screenshot for each configuration we created.
If you have specific features you want to disable (like advertising, subscription dialog, etc.), using environment variables in the shared settings is a good way to pass it along to your tests, which can pass it through to the build app.
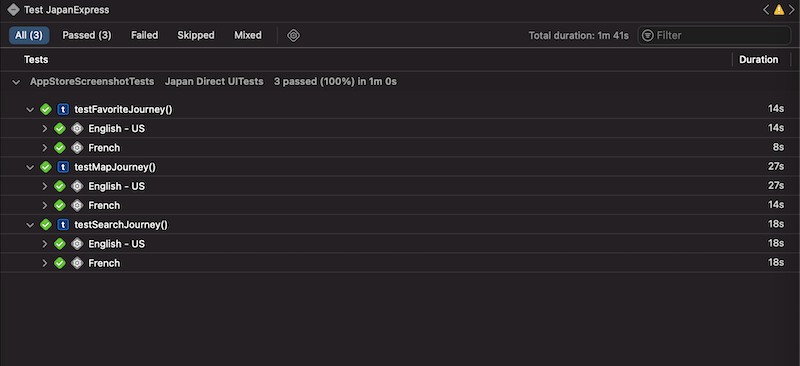
From there, when we run our tests based on this plan, it will run each of our test and capture screenshot for each configuration we gave. For my case, it creates screenshots in English and French which already me a lot of time.
Automation
So far, we’ve defined which screen to capture using XCTest and we used Xcode Test Plan to localize it and create a whole suite of journey to save. The last thing we can do is push this further and automate it.
If you have not noticed it yet, test result attachment are not really straightforward to export. We need to manually go through preview or use an exporting tools for that. I found that xcparse does the job pretty well in this case.
xcparse screenshots --os --model --test-plan-config /path/to/Test.xcresult /path/to/outputDirectory
Now we can finalize it using any scripting tools you are familiar with. Since mine is a really small project and I’m the only contributor, I’ve used a bash script to run my tests with xcodebuild test and use xcparse to export them into a separate folder.
Wait, all of this sounds familiar? Doesn’t fastlane can do it?
Actually, yes :)
I’ve realized as well Fastlane snapshot relies on the same idea to capture screenshots around your app. This solution though uses a very limited amount of dependencies and let you hands-on to tweak it based on your own need. Also, the localization comes from Xcode Test Plan which makes it easier to configure rather than using external tools for it like snapshot does.
I like the idea of using custom script here that we could pair with a Google Drive / Dropbox / Slack upload to pass along to your design team if anything needs to be framed. We could also link it to a CI/CD environment to let your teammates capture those screenshot on demand without needed developers.
Either way, we have plenty of cool stuff to improve App Store screenshot processes.
In conclusion, we saw how to create very simple UI Test in Xcode to validate key journey and capture screenshot. We took advantages of Xcode Test Plan configuration to localize each of our screenshot and make it easier to extend to new languages in future.
Finally, we discussed different solutions to automate it, if it is for custom script or more complex system, so that capturing localized screenshots of your app for the App Store isn’t a burden anymore. Keep in mind that this small effort can really improve your first user’s experience with your product. I believe it’s what we should always aim for.