Setting up Auto Layout constraints programmatically in Swift
In iOS development, content alignment and spacing is something that can take a lot of our time. Today, let’s explore how to set constraint with UIKit, update them and resolve constraint conflicts.
Let’s start with a simple definition: a constraint is a rule to let the operating system how to place your UI component.
It was introduced in iOS6 and iPadOS6. It was a simpler way to create scalable and reusable design across Apple devices.
With UIKit, there are 2 main ways to setup constraints: using interface builder and programmatically. This article will only focus on the code approach.
Creating new constraint
First thing we have to do is to enable the view for Auto Layout:
let view = UIView(frame: .zero)
view.translatesAutoresizingMaskIntoConstraints = false
From there, we have few options to setup the constraint, either by Anchors or Visual Format Language (or VFL).
Here is two examples of the same constraints, setting height and width to 100.
// Anchors
view.heightAnchor.constraint(equalToConstant: 100)
view.widthAnchor.constraint(equalToConstant: 100)

// VFL
let viewDictionary = ["view": view]
let horizontalConstraints = NSLayoutConstraint.constraints(withVisualFormat: "H:[view(100)]", metrics: nil, views: viewDictionary)
let verticalConstraints = NSLayoutConstraint.constraints(withVisualFormat: "V:[view(100)]", metrics: nil, views: viewDictionary)
VFL can be a good fit for a simple view, but the syntax is not always easy to read if we have a lot of views to handle. Compared to VFL, Anchors is more commonly used and doesn’t require to handle constraints from its superView.
You get the idea though, anything we can do with Anchors, we can do with Visual Format Language, and vice-versa. It’s more a code flavor. For the rest of the article, I’ll stick with Anchors.
Regarding the constraint itself, we can define a lot of them. It can be for the dimension like width and height, but also the position of the view, from its edges (left, right, top and bottom) or center. We can also create constraint between different views to match alignment or dimensions, and so on.
Activating constraints
An important step to make constraints work is to activate them. It doesn’t apply by default.
To do so, you can either switch the constraint to isActive, one at a time, or use .activate() function to update a batch of constraints at once.
let heightConstraint = view.heightAnchor.constraint(equalToConstant: 100)

// Activate one at a time
heightConstraint.isActive = true

// Activate multiple at a time
NSLayoutConstraint.activate([
    heightConstraint,
    ...
])
You can deactivate them the same way.
// Deactivate one at a time
heightConstraint.isActive = false

// Deactivate multiple at a time
NSLayoutConstraint.deactivate([
    heightConstraint,
    ...
])
Note that to deactivate a constraint, it requires to access the reference to the activated constraint. You cannot just copy/paste the definition of it.
// Activating
view.heightAnchor.constraint(equalToConstant: 100).isActive = true

// Deactivating? Not really
view.heightAnchor.constraint(equalToConstant: 100).isActive = false
This code doesn’t deactivate the first one, it create a separate (duplicated) constraint and deactivate it. The first one still applies.
Manipulating constraints
Constraints can be updated after being applied, to change spacing or dimension for instance.
let heightConstraint = view.heightAnchor.constraint(equalToConstant: 100)
heightConstraint.constant = 50
We can also animate view through constraints. The key is to make sure to call layoutIfNeeded().
UIView.animate(withDuration: 1.0, animations: {
    heightConstraint.constant = 50
    view.layoutIfNeeded()
})
Resolving constraint conflicts
Now that we have explore the basics how to add, edit and activate constraints, here comes the trouble: resolving conflicting constraints.
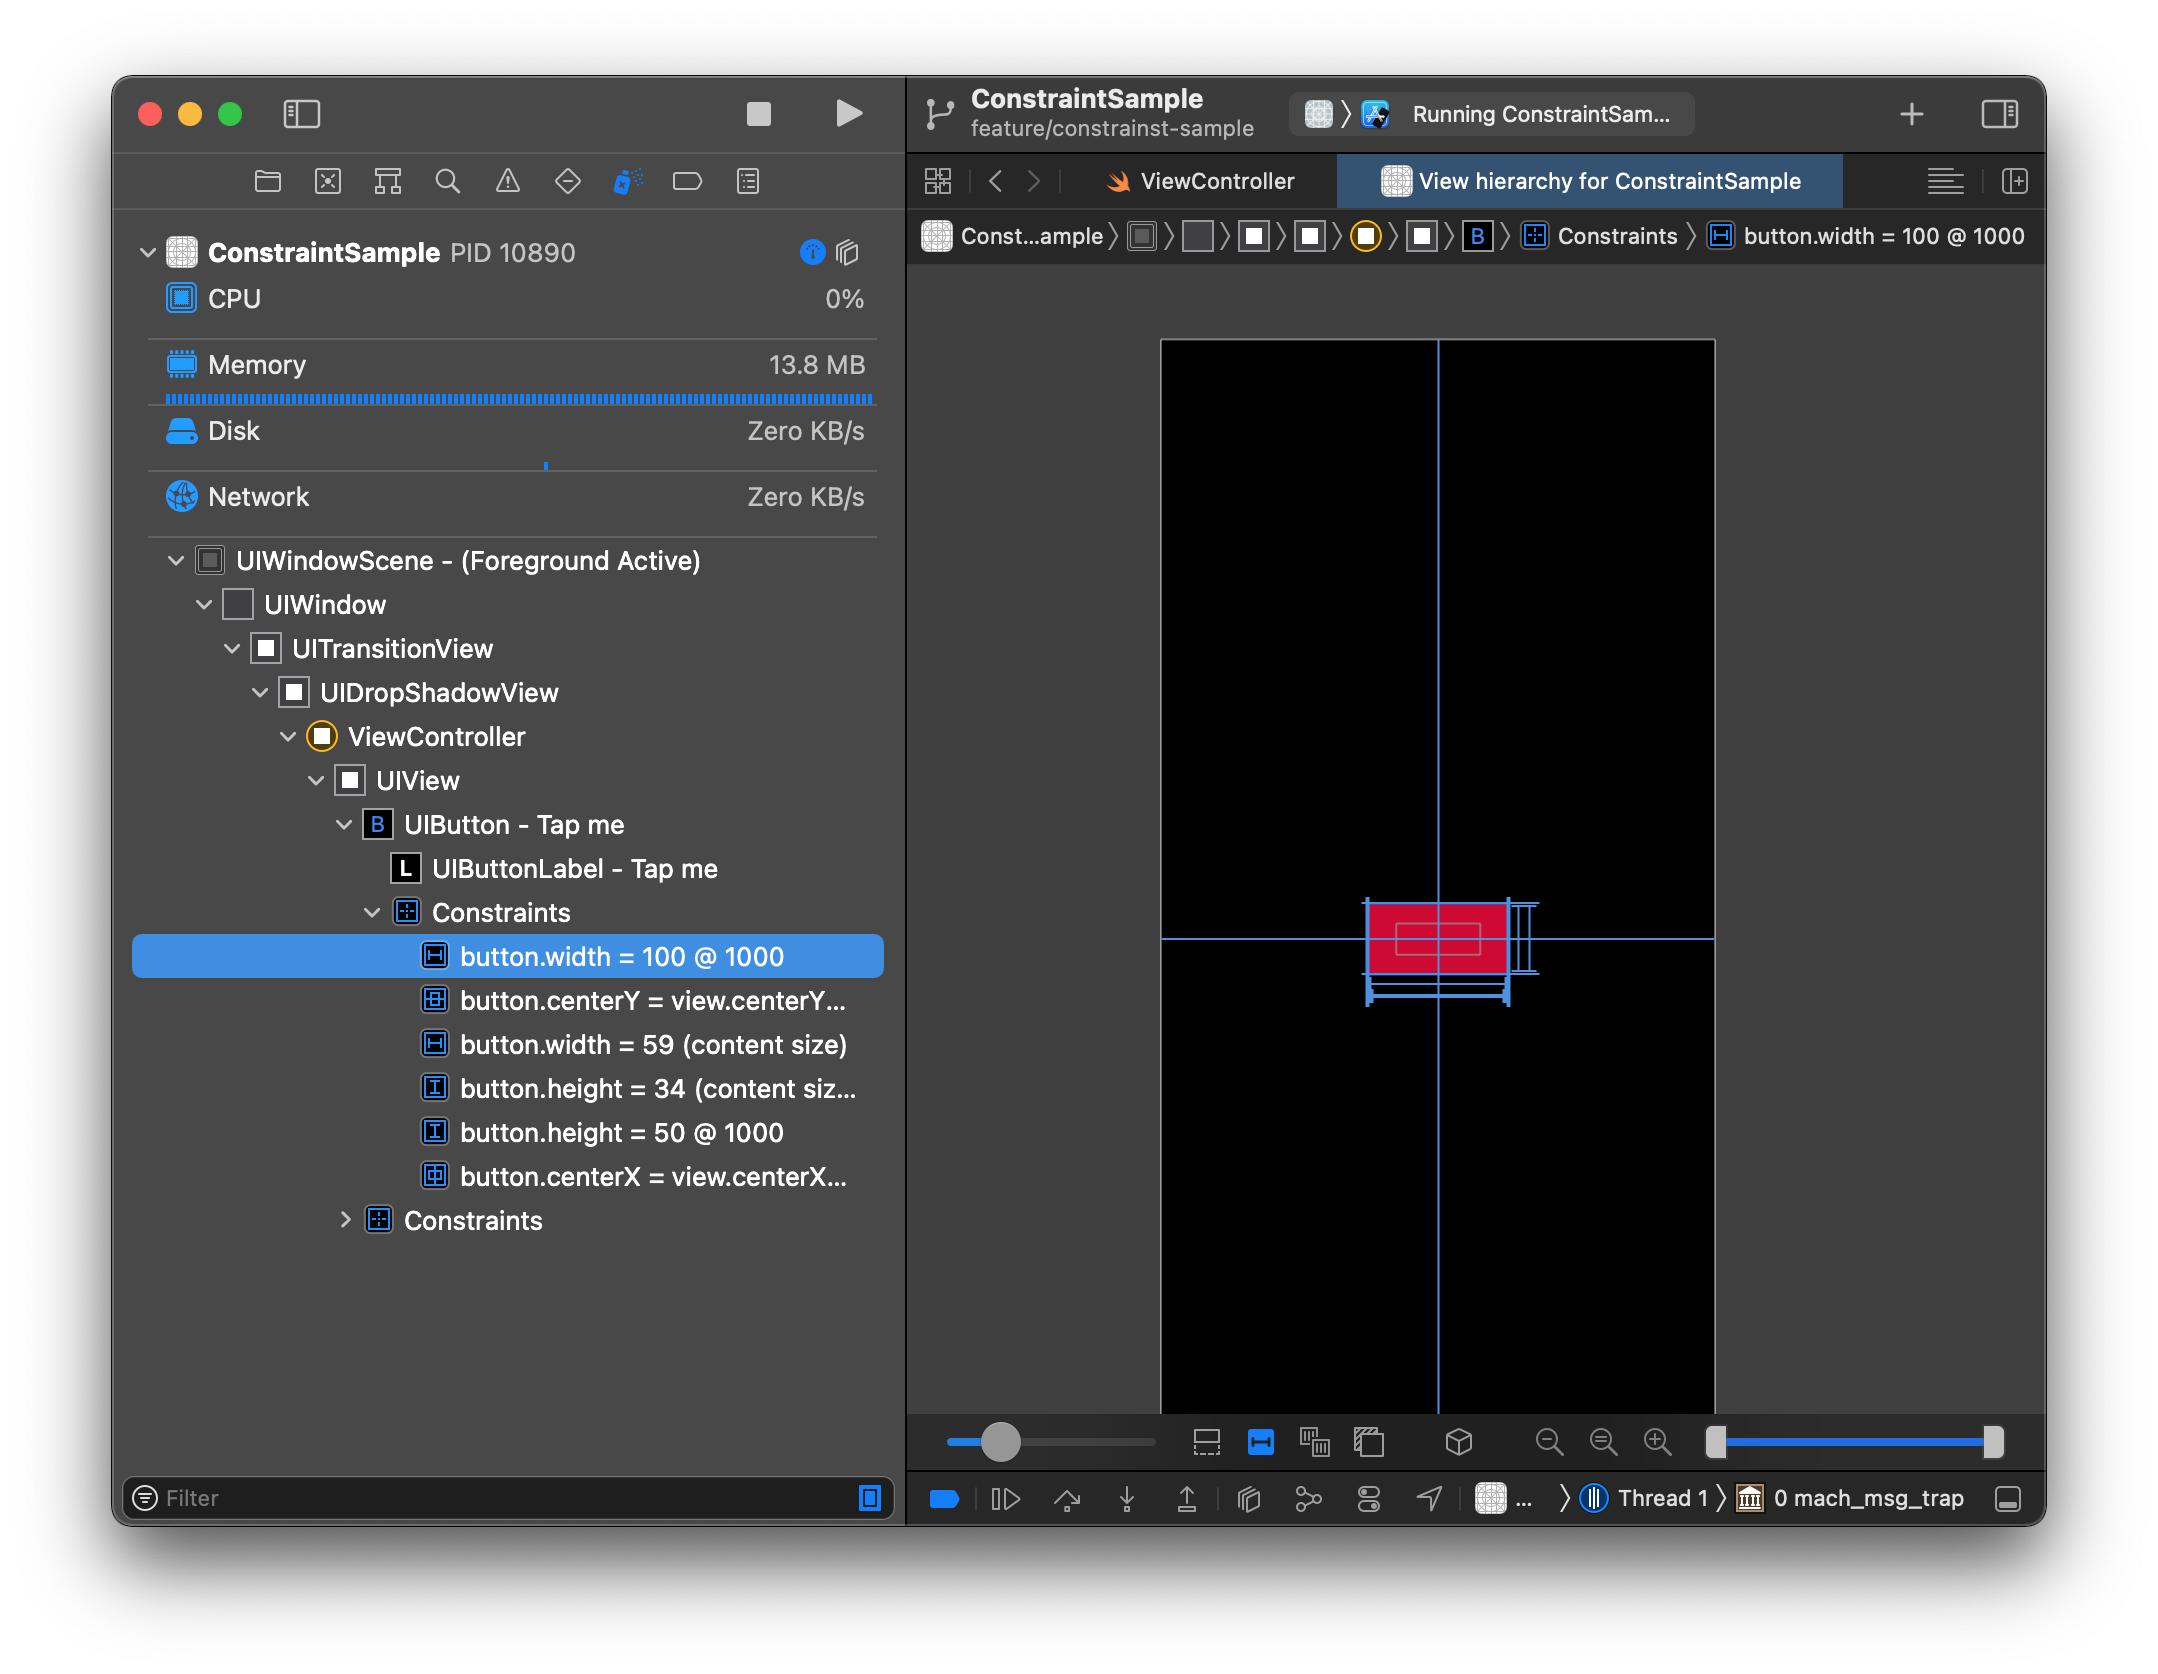
In most cases, Xcode will indicate it in the Console that it cannot resolve constraints in the Console. When opening Debug View Hierarchy, we can inspect each constraint and detect where the conflict comes from.

Conflicts almost always due to priority issues. If I set a view height constraint to 100 then another constraint to 50, the system cannot tell which one to enforce.
This will create a conflict.
view.heightAnchor.constraint(equalToConstant: 100).isActive = true
view.heightAnchor.constraint(equalToConstant: 50).isActive = true
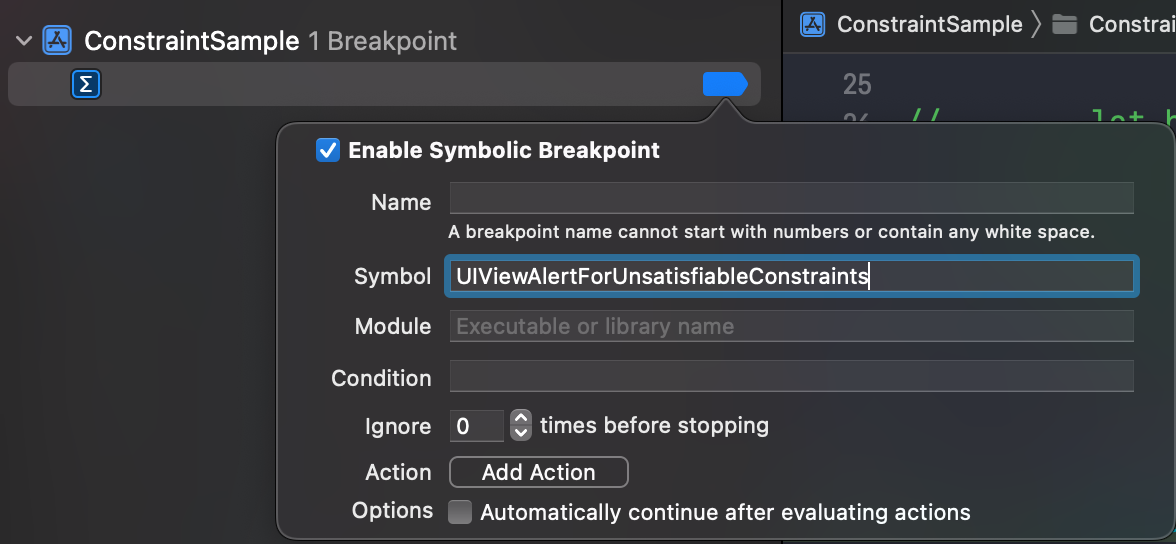
To detect this kind of conflict, we can setup a Symbolic Breakpoint with UIViewAlertForUnsatisfiableConstraints to detect those wrongly setup.

Once we identified which constraints are conflicting, then we can change the priority in favor of one and reduce the second, highest being 1000.
let heightConstraint1 = view.heightAnchor.constraint(equalToConstant: 100)
let heightConstraint2 = view.heightAnchor.constraint(equalToConstant: 50)

// height 100 applies
heightConstraint1.priority = 1000
heightConstraint2.priority = 999

// height 50 applies
heightConstraint1.priority = 999
heightConstraint2.priority = 1000
If you don’t want to manipulate the priority yourself and get confused with value, there are predefined values we can reuse.
heightConstraint1.priority = .required
heightConstraint2.priority = .defaultLow
Auto Layout and Constraint Resistance
For some UIView, we cannot always enforce a specific dimension. For instance, if we have a UIButton with Tap and hardcode the value, when we localize it to other regions, the text could be cut off.
To handle this without requiring to change the priority, we can use different set of constraint functions to avoid those behaviors. Two of them are Content Hugging and Content Resistance.
- Hugging is to make sure the view shouldn’t grow further
- Resistance is to make sure the view shouldn’t shrink further
Back to my UIButton Tap, instead of setting up width constraint to avoid any cut off, I can enforce resistance to avoid any shrinking. A different localization text will extend it to always be fully displayed.
button.setContentResistancePriority(.required, for: .horizontal)
It can work the same for Content Hugging, horizontal or vertical, with a different set of priority
view.setContentHuggingPriority(.defaultLow, for: .vertical)
Safe area constraints
With multiple devices to support, anchoring only might not be enough. For instance, what if you have a status bar or navigation bar, how do we factor the home button area for new iPhones?
Thankfully, UIKit comes with a property safeAreaLayoutGuide to adapt to its safe area so we can focus on the view and less on the device spacing area. It allows us to have same spacing for an iPhone8 or iPhone13 for instance.
In this example, I safely set a UITextView to fit another view safe area.
NSLayoutConstraint.activate([
    textView.topAnchor.constraint(equalTo: view.safeAreaLayoutGuide.topAnchor),
    textView.leftAnchor.constraint(equalTo: view.safeAreaLayoutGuide.leftAnchor),
    textView.rightAnchor.constraint(equalTo: view.safeAreaLayoutGuide.rightAnchor),
    textView.bottomAnchor.constraint(equalTo: view.safeAreaLayoutGuide.bottomAnchor),
])
Conclusion
In conclusion, Auto Layout is a very powerful api. It definitely made development easier to apply a design across multiple devices and resize to the right dimension.
With safe area constraint and different priority, it gets easier and easier to adapt to new devices, from iPhone 13 mini to iPad Pro.
As we can create a lot of them very quickly, it can be hard to keep track of all of them when a conflict occurs. Thankfully, Xcode came with different tools to monitor this.
Should you set constraints programmatically? I would say it’s more about code flavor.
I often chose to set constraints programmatically to make it easier to maintain and debug as I have many teammates. That being said, you know best your project, you can try and see what make more sense to you and your team.
What about you? What do you use and prefer when it comes to Auto Layout?